ShopDreamUp AI ArtDreamUp

Deviation Actions


Suggested Deviants


Suggested Collections


You Might Like…


Featured in Groups


Description
For Phase 3, Click here: [link]
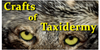
39.) Superglue -OR- pin the lips into place. I prefer superglue as it bonds skin very well! Just be sure it isn't your skin. I recommend pinning the crap out of it for all you who are not friends with superglue.
40.) Pin the front corner of the tear duct. This will keep the eyeskin from moving off-course when you go to tuck in the eyelids.
41.) With a stiff paintbrush, tuck the eyelid skin under your clay brows so the skin is between the brow clay and the glass eye. You could adjust the eye to the expression you want, but it isn't recommended until further on when the rest of the skin is in place (or else the eye will shift on you and you'll be chasing it until you are frustrated)
42.) Card the cheeks and jawline with some cardboard (like that thin stuff from cereal boxes). This prevents the skin from drumming on you, thus creating a hollow pocket between the form and skin. Use T-pins to secure the skin down into the form.
43.) Now you can play with the eyes. Adjust them to the width you want them and set the eyebrow creases.
44.) The red lines will show you where to put your brow creases. You can make them harsh or soft depending on the mood of your wolf (I went for a softer happy look)
45.) Model the nose to the shape you want it. I tend to make my nostrils really deep. Pack in the clay so it gives some anchor to the skin if the foam is really mangled. Look into reference pictures for the type of nose you would want your wolf to have (some are flared more than others)
46.) Play with your facial expressions (I love this picture... Wolfie looks crazy wacky!) But cover up each half of my wolf's face and look at the expressions. The left half seems really angry/pissed while the right half looks a bit more relaxed. You will need to constantly look at the placement of your ears, to make sure they are level, as well as the carding and the nose.
47.) Finally, Settle on an expression you like and leave it to dry for 2-3 days. Babysit it by checking up on it every couple hours to make sure the skin doesn't shift on you. Over the drying period, the skin DOES tend to shrink by pulling away from the eyes.... Keep an eye out for this, and you can keep playing with it until the clay hardens.
The overall head should be dry in 2-3 days at room temperature.... 4 to be safe.
")
THIS ENDS PHASE 3 OF THE TUTORIAL.
Stay tuned for PHASE 5! (the painting and stuff that makes the wolf look REAL!
______________________________
______________________________
Disclaimer: I did not hunt this wolf. It came to me already tanned from a fellow taxidermist (who didn't hunt it either). I bought it from him and am building this costume/rug for a friend of mine. This wolf came from Canada (NOT Alaska) and was imported with all Federally Legal paperwork!
Therefore the skin was not from a poached animal. All of my skins are legally obtained from taxidermy facilities or licensed hunters I speak with personally.
SO DON'T LEAVE MEAN COMMENTS!
For God's Sake! Only STUPID people leave comments on things they Hate!!!!
For all you who love learning the art of taxidermy...
ENJOY!

39.) Superglue -OR- pin the lips into place. I prefer superglue as it bonds skin very well! Just be sure it isn't your skin. I recommend pinning the crap out of it for all you who are not friends with superglue.
40.) Pin the front corner of the tear duct. This will keep the eyeskin from moving off-course when you go to tuck in the eyelids.
41.) With a stiff paintbrush, tuck the eyelid skin under your clay brows so the skin is between the brow clay and the glass eye. You could adjust the eye to the expression you want, but it isn't recommended until further on when the rest of the skin is in place (or else the eye will shift on you and you'll be chasing it until you are frustrated)
42.) Card the cheeks and jawline with some cardboard (like that thin stuff from cereal boxes). This prevents the skin from drumming on you, thus creating a hollow pocket between the form and skin. Use T-pins to secure the skin down into the form.
43.) Now you can play with the eyes. Adjust them to the width you want them and set the eyebrow creases.
44.) The red lines will show you where to put your brow creases. You can make them harsh or soft depending on the mood of your wolf (I went for a softer happy look)
45.) Model the nose to the shape you want it. I tend to make my nostrils really deep. Pack in the clay so it gives some anchor to the skin if the foam is really mangled. Look into reference pictures for the type of nose you would want your wolf to have (some are flared more than others)
46.) Play with your facial expressions (I love this picture... Wolfie looks crazy wacky!) But cover up each half of my wolf's face and look at the expressions. The left half seems really angry/pissed while the right half looks a bit more relaxed. You will need to constantly look at the placement of your ears, to make sure they are level, as well as the carding and the nose.
47.) Finally, Settle on an expression you like and leave it to dry for 2-3 days. Babysit it by checking up on it every couple hours to make sure the skin doesn't shift on you. Over the drying period, the skin DOES tend to shrink by pulling away from the eyes.... Keep an eye out for this, and you can keep playing with it until the clay hardens.
The overall head should be dry in 2-3 days at room temperature.... 4 to be safe.
THIS ENDS PHASE 3 OF THE TUTORIAL.
Stay tuned for PHASE 5! (the painting and stuff that makes the wolf look REAL!
______________________________
______________________________
Disclaimer: I did not hunt this wolf. It came to me already tanned from a fellow taxidermist (who didn't hunt it either). I bought it from him and am building this costume/rug for a friend of mine. This wolf came from Canada (NOT Alaska) and was imported with all Federally Legal paperwork!
Therefore the skin was not from a poached animal. All of my skins are legally obtained from taxidermy facilities or licensed hunters I speak with personally.
SO DON'T LEAVE MEAN COMMENTS!
For God's Sake! Only STUPID people leave comments on things they Hate!!!!
For all you who love learning the art of taxidermy...
ENJOY!
Image size
1898x3300px 3.64 MB
© 2008 - 2024 Zhon
Comments65
Join the community to add your comment. Already a deviant? Log In
that is fake right not a real wolf skin ")